By Root Freedom | Natural Wellness
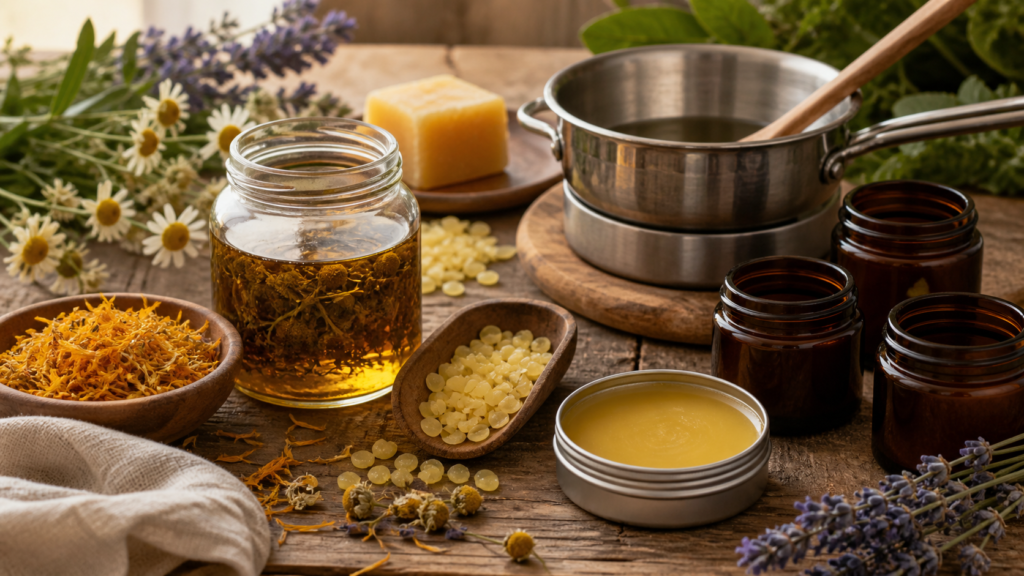
A healing herbal salve is one of the most useful things you can make at home. It takes less than an hour, costs a fraction of commercial alternatives, and gives you complete control over what goes on your skin.
Once you know how to make a healing herbal salve the formula applies to dozens of different herb combinations — each one targeting a specific skin or healing need. This is the foundation skill of home herbal medicine making.
What Is an Herbal Salve?
A salve is a semi-solid preparation made from herbal infused oil and beeswax. The oil carries the medicinal compounds from the herbs and the beeswax gives it a solid texture that melts on contact with skin. It’s applied topically for wound healing, skin conditions, pain relief, and more.
The difference between a salve and a cream is simple — salves contain no water, creams do. This makes salves more stable, longer lasting, and more concentrated.
What You’ll Need
For the herbal infused oil:
- 1 cup dried herb of your choice
- 1 cup carrier oil — olive, jojoba, or sweet almond oil
For the salve:
- 1 cup herbal infused oil
- 1 oz beeswax pellets — approximately 2 tablespoons
- Optional: 10-20 drops essential oil for additional therapeutic benefit
- Optional: 1 teaspoon vitamin E oil as a natural preservative
Equipment:
- Double boiler or heat-safe bowl over saucepan
- Fine mesh strainer or cheesecloth
- Small tins or glass jars for storage
- Wooden spoon or chopstick for stirring
Where to get your herbs and supplies: Dried herbs from Starwest Botanicals. Beeswax pellets and carrier oils on Amazon. Tins and jars on Amazon.
Step 1 — Make Your Herbal Infused Oil
This is the foundation of your salve and the step that takes the most time.
Slow cold infusion method — best quality: Pack a clean dry glass jar with your dried herb. Cover completely with carrier oil leaving ½ inch headspace. Seal tightly. Place in a sunny warm window or warm spot. Infuse for 4-6 weeks shaking daily. Strain through cheesecloth squeezing every drop of oil from the herb material.
Quick heat infusion method — faster results: Place dried herbs and carrier oil in a double boiler. Heat on the lowest possible setting for 2-3 hours — the oil should be warm but never simmering. Strain through cheesecloth when done.
The slow cold infusion produces higher quality oil with more intact medicinal compounds. Use the heat method when you need salve quickly.
Step 2 — Melt the Beeswax
Place your strained herbal infused oil in a double boiler over low heat. Add beeswax pellets — 1 oz per cup of oil produces a standard salve consistency.
Stir gently until beeswax is completely melted and combined with the oil. Remove from heat.
Consistency test: Dip a spoon in the mixture and place in the freezer for 2 minutes. If the cooled salve is too hard add more oil. If too soft add more beeswax. Reheat and adjust as needed.
Step 3 — Add Essential Oils and Pour
Working quickly before the mixture cools and solidifies add your essential oils and vitamin E oil if using. Stir well.
Pour immediately into your tins or jars — the mixture sets fast. Leave undisturbed until completely cool and solid — at least 1 hour at room temperature.
Label with contents and date. Store in a cool dark place — salves keep for 1-2 years without water-based ingredients.
5 Healing Salve Recipes
Salve 1 — Calendula Healing Salve
The most versatile and useful salve to make first.
Herbs: Dried calendula petals infused in olive oil Essential oils: 10 drops lavender + 5 drops tea tree oil Best for: Cuts, scrapes, rashes, eczema, dry cracked skin, minor burns, diaper rash, general wound healing
Salve 2 — Pain Relief Salve
For muscle aches, joint pain, and tension headaches.
Herbs: Dried arnica flowers + dried St. John’s wort infused in olive oil Essential oils: 15 drops peppermint + 10 drops eucalyptus + 5 drops rosemary Best for: Muscle soreness, joint pain, tension headaches applied to temples, bruises, sports injuries
Important: Never apply arnica to broken skin.
Salve 3 — Chest Rub Salve
Natural alternative to commercial vapor rubs.
Herbs: Dried thyme + dried eucalyptus leaves infused in coconut oil Essential oils: 15 drops eucalyptus + 10 drops peppermint + 5 drops rosemary Best for: Chest congestion, coughs, sinus congestion, respiratory infections — apply to chest and throat
Salve 4 — Lip Balm Salve
Healing and moisturizing lip treatment.
Herbs: Dried rose petals + dried calendula infused in jojoba oil Essential oils: 5 drops lavender + 3 drops peppermint Beeswax ratio: Increase to 1.5 oz per cup of oil for firmer lip balm consistency Best for: Chapped lips, cold sores, dry cracked lips, lip healing
Salve 5 — Skin Repair and Anti-Aging Salve
For mature skin, scarring, and intensive skin repair.
Herbs: Dried rosehip + dried calendula infused in rosehip seed oil Essential oils: 10 drops frankincense + 5 drops lavender + 5 drops rose oil Best for: Scarring, stretch marks, aging skin, hyperpigmentation, skin repair after damage
Choosing Your Herbs
| Herb | Best for | Salve use |
|---|---|---|
| Calendula | Wound healing, skin soothing | All-purpose healing salve |
| Arnica | Bruises, muscle pain | Pain relief salve |
| St. John’s Wort | Nerve pain, bruising | Pain and nerve salve |
| Lavender | Burns, acne, wounds | Add to any salve |
| Plantain leaf | Insect stings, splinters | Drawing salve |
| Comfrey | Bone and tissue healing | Joint and injury salve |
| Chamomile | Sensitive inflamed skin | Gentle skin salve |
Where to get all these herbs: Starwest Botanicals carries the full range of dried herbs for salve making.
If you want to go deeper on herbal preparations and learn how to work with herbs confidently at home, the Herbal Academy covers salve making and all the foundational preparation methods in their introductory course — we put together an honest review here.
Troubleshooting Common Salve Problems
Salve is too hard: Too much beeswax. Remelt and add more oil until consistency is right.
Salve is too soft: Too little beeswax. Remelt and add more beeswax.
Salve separated: Water got into the mixture or essential oils were added while too hot. Start over — contamination with water causes salves to mold.
Salve smells rancid: Oil went bad before or during infusion. Always use fresh oils and dry herbs completely before infusing.
Herb material in salve: Straining wasn’t thorough enough. Pour through a double layer of cheesecloth and squeeze firmly.
Storing and Shelf Life
Store in a cool dark place — a medicine cabinet, pantry shelf, or drawer works perfectly. Keep away from direct sunlight and heat.
Shelf life: 1-2 years for properly made salves without water. The vitamin E oil addition extends shelf life by reducing oxidation.
Signs of spoilage: Off smell, visible mold, or change in texture. Discard immediately if any of these appear.
Related Posts You’ll Love
- Best Herbs for Skin Health and Healing — the herbs behind your healing salves
- How to Make Herbal Infused Oil at Home — master the foundation of salve making
- Herbal First Aid Kit — your calendula salve belongs in every first aid kit
- How to Start a Medicinal Herb Garden From Scratch — grow the herbs for your salves
- How to Dry and Store Herbs From Your Garden — properly dried herbs are essential for salve making
- Natural Remedies for Back Pain — the pain relief salve recipe pairs perfectly with the internal back pain protocol in this post
Get Your Free Natural Home Remedies Quick Reference Card
12 common ailments, the herb that helps, and exactly how to use it — free instant download.
Disclaimer: This post contains affiliate links. Root Freedom may earn a commission when you purchase through our links at no extra cost to you. This content is for informational purposes only and is not intended as medical advice.