By Root Freedom | Natural Wellness
Growing your own medicinal herbs is one thing. Knowing how to properly dry and store them is what turns a summer harvest into a year-round natural wellness supply.
Most people make the same mistakes — drying too slowly, storing in clear containers, or waiting too long to harvest. The result is herbs that lose their color, aroma, and medicinal potency within weeks. Done correctly your dried herbs will maintain full potency for 1-2 years.
Here’s how to Dry and Store Herbs from your Garden the right way.
When to Harvest for Maximum Potency
Timing your harvest correctly is the single most important factor in herb quality. Medicinal compounds are at their highest concentration at specific points in the plant’s growth cycle.
Leafy herbs — harvest just before flowering. This is when the plant’s energy is still concentrated in the leaves rather than the flowers. The leaves will be most aromatic and medicinally potent at this stage.
Flowering herbs — harvest when flowers are just opening, not fully open. Chamomile, lavender, and calendula should be picked when the first petals open — not when fully bloomed.
Roots — harvest in fall after the plant has died back. The plant’s energy has returned to the roots for winter storage making fall roots the most medicinally concentrated.
Seeds — harvest when seed heads are dry and beginning to drop naturally.
Time of day matters too. Always harvest in the morning after the dew has dried but before the heat of the day peaks. Essential oil content — the source of most medicinal activity — is highest in the cool morning hours.
Once you’ve built your dried herb supply, knowing which herbs to prioritize is just as important — see our guide on the Best Herbs for Immune Support to know which ones deserve a permanent spot in your wellness cabinet.
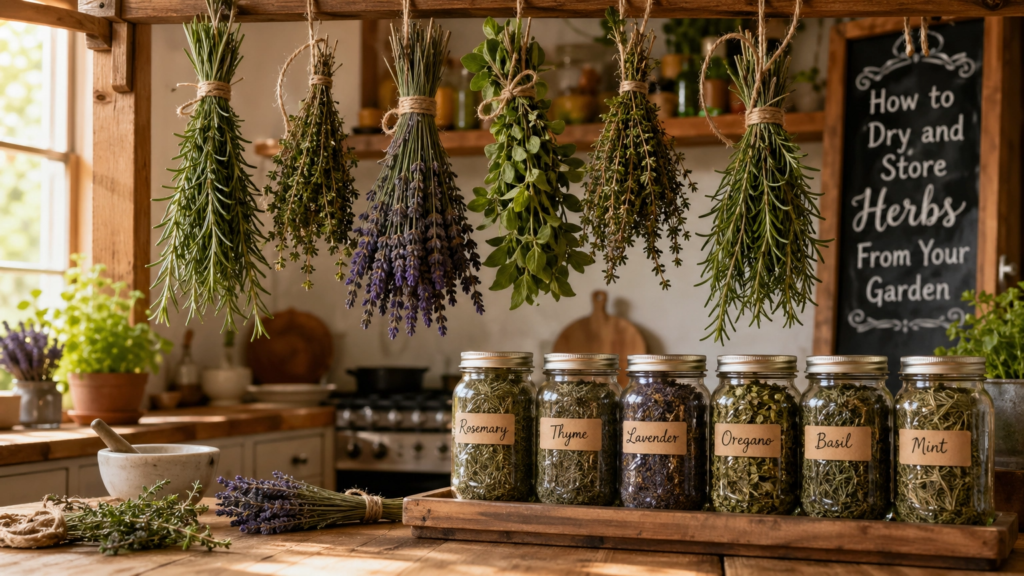
Method 1 — Air Drying
Air drying is the oldest and simplest method. It requires no equipment and produces excellent results for most leafy herbs and flowers.
How to air dry:
Gather stems into small bundles of 5-10 stems. Secure with a rubber band or twine — rubber bands are actually better because they contract as stems shrink during drying, keeping the bundle tight.
Hang bundles upside down in a warm, dry, well-ventilated space away from direct sunlight. A spare room, attic, covered porch, or dry basement all work well.
Critical conditions for successful air drying:
- Temperature: 70-90°F ideal
- Humidity: below 60% — high humidity causes mold
- Air circulation: good airflow prevents moisture buildup
- Light: minimal — UV light degrades medicinal compounds
Most herbs air dry completely in 1-3 weeks depending on moisture content and conditions. They’re ready when leaves crumble easily between your fingers and stems snap cleanly.
Best herbs for air drying: Lavender, rosemary, thyme, oregano, mint, lemon balm, chamomile, calendula, echinacea.
Where to get started: Grow your own herbs from seed with Seeds Now — having a steady supply means you can harvest and dry in batches throughout the season.
Method 2 — Dehydrator Drying
A food dehydrator is the most consistent and reliable drying method. It gives you control over temperature and airflow producing uniform results every time — particularly important for medicinal herbs where potency matters.
How to dehydrator dry:
Spread herb material in a single layer on dehydrator trays — don’t overlap or stack. Set temperature to 95-115°F for most herbs. Lower temperatures preserve more volatile oils but take longer. Higher temperatures speed drying but can degrade delicate compounds.
Drying times at 95-105°F:
- Leafy herbs: 2-4 hours
- Flowers: 1-3 hours
- Roots sliced thin: 4-8 hours
- Thick stems: 4-6 hours
Check every hour — herbs go from almost dry to overdry quickly. They’re done when completely crisp with no flexibility remaining.
Best herbs for dehydrator drying: All herbs but particularly high-moisture herbs like basil, lemon balm, and mint that can mold during slow air drying.
Where to get one: A basic food dehydrator on Amazon — worth the investment if you’re serious about your herb garden.
Method 3 — Oven Drying
Oven drying is the fastest method but the least ideal for medicinal herbs. Most ovens can’t maintain temperatures low enough to preserve volatile oils without degrading them.
If you must use an oven set it to the lowest possible temperature — ideally below 150°F. Prop the door open slightly to allow moisture to escape. Check every 30 minutes.
Use oven drying only when speed is essential or for culinary herbs where medicinal potency is less critical.
Method 4 — Screen Drying
Screen drying works beautifully for flowers and individual leaves that don’t bundle well. Lay herb material in a single layer on a window screen or mesh drying rack. Place in a warm airy spot out of direct sunlight.
Ideal for: Chamomile flowers, calendula petals, rose petals, lavender buds, and any herb you want to dry individually rather than in bundles.
How to Know When Herbs Are Fully Dry
This is where most beginners go wrong — packaging herbs before they’re completely dry leads to mold and spoilage in storage.
The crumble test: Rub a leaf between your fingers. Fully dry herbs crumble easily into small pieces. If it bends or feels flexible it needs more time.
The snap test: Bend a stem. Fully dry stems snap cleanly. If they bend they’re still too moist.
The smell test: Fully dried herbs smell strongly aromatic. If the scent is weak or smells slightly fermented they may have dried too slowly or begun to mold.
When in doubt — give it another day. Slightly over-dried is much better than slightly under-dried for storage purposes.
Proper Storage — The Difference Between 6 Months and 2 Years
How you store dried herbs determines how long they maintain potency. Follow these rules and your herbs will stay medicinally active for 1-2 years.
Container: Glass is best. Mason jars, swing-top jars, or any airtight glass container works perfectly. Avoid plastic — it’s slightly permeable to air and can leach compounds into your herbs over time.
Size: Fill containers as full as possible — less air space means slower oxidation and longer shelf life.
Light: Store in a dark location or use amber glass jars. UV light degrades chlorophyll and volatile oils rapidly. A cupboard, pantry, or drawer away from windows is ideal.
Temperature: Cool and consistent. Avoid storing near stoves, ovens, or anywhere that experiences temperature fluctuations. Ideal storage temperature is 60-70°F.
Humidity: Keep away from steam and moisture. Never store above a stove or near a dishwasher.
Labeling: Label every jar with the herb name, part used, harvest date, and drying method. This seems unnecessary until you have 20 unlabeled jars of similar-looking green herbs.
Shelf Life Guide for Dried Herbs
| Herb type | Properly stored shelf life |
|---|---|
| Leafy herbs | 1-2 years |
| Flowers | 1-2 years |
| Roots and bark | 2-3 years |
| Seeds | 2-3 years |
| Powdered herbs | 6-12 months |
Powdered herbs have a shorter shelf life because more surface area is exposed to air and light. Buy or grind only what you’ll use within a few months.
Signs Your Herbs Have Gone Bad
Faded color: Fresh dried herbs are vibrant — deep green leaves, bright yellow chamomile, vivid purple lavender. Significantly faded color means potency has degraded.
Weak or no smell: Medicinal herbs should smell strongly aromatic. If you open a jar and barely smell anything the volatile oils have evaporated and potency is gone.
Mold: White fuzzy growth means the herbs weren’t fully dry before storage. Discard immediately — moldy herbs are not safe to use medicinally.
Off smell: A musty, fermented, or otherwise unpleasant smell indicates spoilage. Discard.
Building Your Herb Drying and Storage System
You don’t need expensive equipment. Here’s a simple setup that works:
- Drying space: A spare closet rod, ceiling hooks, or a simple wooden rack
- Dehydrator: Basic 5-tray model from Amazon
- Storage: 8oz and 16oz mason jars from Amazon
- Labels: Masking tape and a permanent marker work perfectly
Start growing your herb supply with medicinal herb seeds from Seeds Now and dried herbs from Starwest Botanicals while your garden establishes.
Related Posts
- How to Start a Medicinal Herb Garden From Scratch — grow the herbs you’ll be drying and storing all season long
- 10 Herbs Every Natural Wellness Cabinet Needs — the essential herbs worth having dried and ready at all times
- How to Make Elderberry Syrup at Home — one of the best uses for your dried elderberries once harvested
- Best Herbs for Immune Support — know which herbs are worth drying and storing for immune health
- How to Make Herbal Tea Blends at Home — put your dried herbs to use with these blend recipes
Get the Free Herbal Wellness Checklist
Click here to download your free Root Freedom Herbal Wellness Checklist →
Disclaimer: This post contains affiliate links. Root Freedom may earn a commission when you purchase through our links at no extra cost to you. This content is for informational purposes only and is not intended as medical advice.